
文章目录
实验环境
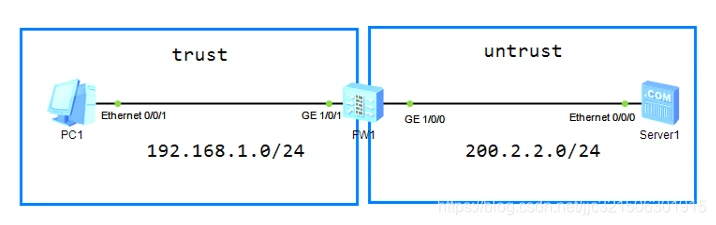
实验思路
- 规划并配置IP
- 设置安全区域
- 设置安全策略
- 检查连通性
具体实施
规划并配置IP:
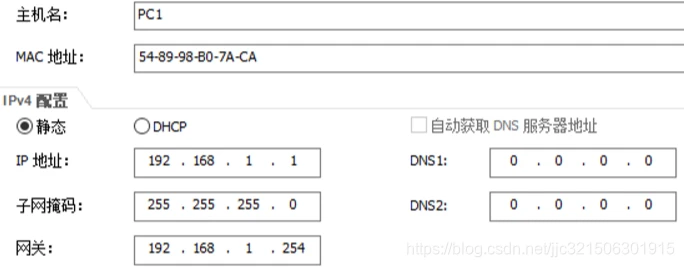
PC1:
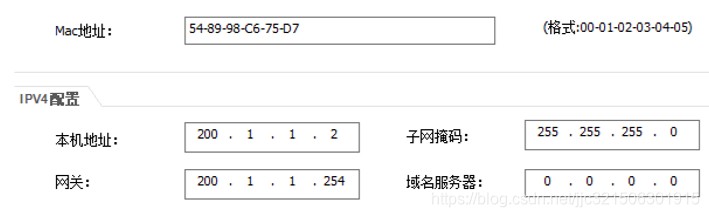
server1:
FW1:
[USG6000V1]int g1/0/1
[USG6000V1-GigabitEthernet1/0/1]undo  shutdown
[USG6000V1-GigabitEthernet1/0/1]ip address 192.168.1.254 24
[USG6000V1-GigabitEthernet1/0/1]service-manage ping permit
[USG6000V1]int g1/0/0
[USG6000V1-GigabitEthernet1/0/0]undo  shutdown
[USG6000V1-GigabitEthernet1/0/0]ip address 200.2.2.254 24
[USG6000V1-GigabitEthernet1/0/0]service-manage ping permit
设置安全区域:
FW1:
[USG6000V1]firewall zone trust
[USG6000V1-zone-trust]add interface g1/0/1
[USG6000V1]firewall zone untrust
[USG6000V1-zone-untrust]add interface g1/0/0
设置安全策略:
FW1:
[USG6000V1]security-policy
[USG6000V1-policy-security]rule name t-u
[USG6000V1-policy-security-rule-t-u]source-zone trust
[USG6000V1-policy-security-rule-t-u]destination-zone  untrust
[USG6000V1-policy-security-rule-t-u]source-address 192.168.1.0 24
[USG6000V1-policy-security-rule-t-u]action  permit
检查连通性:
PC1 ping server:
PC>ping 200.2.2.1

Ping 200.2.2.1: 32 data bytes, Press Ctrl_C to break From 200.2.2.1: bytes=32 seq=1 ttl=254 time=15 ms From 200.2.2.1: bytes=32 seq=2 ttl=254 time=16 ms From 200.2.2.1: bytes=32 seq=3 ttl=254 time<1 ms
From 200.2.2.1: bytes=32 seq=4 ttl=254 time<1 ms From 200.2.2.1: bytes=32 seq=5 ttl=254 time=16 ms

--- 200.2.2.1 ping statistics ---
5 packet(s) transmitted
5 packet(s) received 0.00% packet loss
round-trip min/avg/max = 0/9/16 ms
server ping PC1:

实验总结
本次实验学习了防火墙的原理和配置方法。防火墙用来 保护一个网络区域免受另外一个网络区域的攻击或入侵。本次实验主要介绍了安全区域和安全策略,而安全区域和安全策略是防火墙的重要组成部分。通过安全区域来划分网络以及标识报文的流动,以接口的划分来确认不同的安全区域。其中共有三个安全区域:Untrust、DMZ和Trust以及一个表示自身的Local区域。安全策略则用来检测和控制数据包的流动。与防火墙相连的网段无法直连,且在配置防火墙时不能自动连线,因为接口g0/0/0是管理口。